|

Creating
Your Own Inquiry Unit
The most basic point of a Unit is that it starts with your interest
or need. When we start with a guiding question, we begin to follow what
Dr. Chip Bruce has termed the "cycle of inquiry," which he represents
as this:
For example, when we began to plan for this class, we mentos started
a Unit with the question: "How can WIT best train teachers in the
use of digital libraries?" (Click
here for example) We then began gathering articles about
digital libraries and K—12 technology strategies, and building a
resource list that we put in the "Investigate" section. As we
did this, we also began to take notes from our meetings, formulating what
this class should/could include, putting these comments in both the Create
and Discussion sections. Then we created drafts and-finally-firm products.
We began uploading these as documents to our Unit. Finally, we had solid
links for our modules, the "finished" products thus far. As
this class progresses, we will go back to the "Reflection" section
and enter our thoughts. We also will have each of you add your comments
about this class to this Inquiry Unit, so we can learn how to improve.
If you think about it, the Inquiry Unit, in our case, is a tool to help
us collaboratively answer our original guiding question.
Let's
get started!
From any Inquiry web page you will be able to see the "Inquiry
Units" button in the sidebar on the left-hand side of the screen.
Find and click on the "Inquiry Units" button. You are now at
the "Search Inquiry Units" page.
You are now at the point where you can access the "Add a Unit"
feature.
NOTE:
You must be logged-in in order to create your own Inquiry Unit.
- Click
on the "Add a Unit" button at the top left just
under the banner. You are now ready to create your own Inquiry Unit
- What you see in front of you now is a blank Inquiry Unit form.
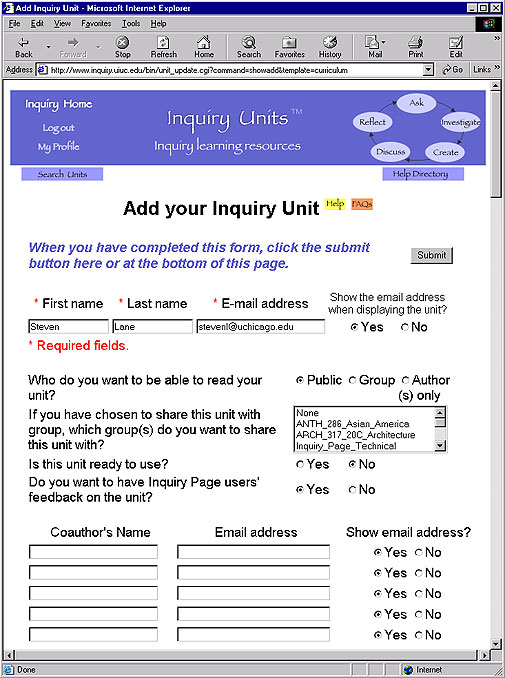 Your first and last name and your email address should have been filled
in automatically by the computer. If these fields are blank, type
your name and email address into the boxes provided, as they are required
fields.
Your first and last name and your email address should have been filled
in automatically by the computer. If these fields are blank, type
your name and email address into the boxes provided, as they are required
fields.
- Next, click
on the appropriate circle either designating your unit as
"Public" or "Private". For right now, we suggest
that you keep it at the default setting, "Public."
- "Public" means that other people can view the unit (Inquiry
members or not).
- "Private" means only you can view the Unit.
- Click
on the appropriate circle, either "Yes" or "No",
next to the question, "Is this unit ready to use?".
- "No" is the default setting, and we suggest that you keep
this at the default setting until you feel that your unit has developed
enough to be used by others.
- Click
on the appropriate circle, either "Yes" or "No",
next to the question, "Do you want your email address on your unit?"
- "Yes" is the default setting, and we suggest that you keep
this at the default setting because this also fosters communication
and builds community between users of the Inquiry Page.
- Type
the names and email addresses of any coauthors into the given boxes (if
you're working in teams). Click on the appropriate circle next to each
coauthor's email address, either "Yes" or "No", in
answer to the question, "Show email address?"
- The first section of the form is labeled "ASK", which is
one of five stages of the Inquiry cycle. In the "ASK" stage,
we begin with a guiding question or thought for your particular line
of inquiry.
- In the box labeled "Guiding question for this unit. This question
is the unit title.", type an initial question that will help to
focus the purpose of your Unit. This question should be short enough
to form the title of your unit.
- Examples of real guiding questions on the Inquiry Page are:
"What library and information services are provided for librarians
serving the Latino community?" and
"How do educators use Chickscope to help students learn?"
- For today, think of a topic you want to find more about and put it
in question form. You will no doubt edit and change this question, so
don't worry about getting locked into it. This is a required field (shown
by the red asterisk).
- Next, click
on the boxes next to the applicable subject/curricular areas
in which your unit may fit. You may choose as many as you think apply
to your unit. Feel free to list areas in the "Others" box.
These terms will serve as search terms for users.
- In the box labeled "Enter keywords…", type
any applicable words that will help others search for your unit. For
example, if my unit is "How do frogs grow?" I may include "polliwog,"
"tadpoles," and "eggs".
- In the box labeled "Open Directory", type
the same or similar search terms as you typed in the box labeled "Enter
keywords…".
- Open Directory Project is a directory of the web using common search
terms, and edited by volunteer editors.
- If you are creating this unit as part of one of our partner projects,
click
on the box next to the appropriate partner project.
- Next, click
on the box(es) next to the grade levels that your unit most
serves. Again, this is yet another way for your unit to be searched for
by other Inquiry Page users.
- In the box labeled, "Please write a brief rationale of your unit.",
type
a simple statement of how your guiding question came to interest you.
- For example, "The study of frogs in the third grade classroom
became an engaged activity when one of my students found frog eggs
and we incubated them in the class. I realized we could serve the art,
language arts, science, and even math curriculum around this one topic
of interest."
- The second section of the form is labeled "INVESTIGATE",
which is one of five stages of the Inquiry cycle. At this stage of inquiry,
you will be building a list of resources you find useful as you follow
your guiding question:
| Articles |
Books |
| Video |
Multimedia Materials |
| Websites |
Audio |
| Other Resources |
|
Make your list of resources complete bibliographic references so others
can use them.
- The third section of the form is labeled "CREATE", which
is one of the five stages of the Inquiry cycle. In this box, type activities
learners might engage in while they conduct this inquiry. Here is where
you will be building on the information you've gathered and begin to
"create" new knowledge.
- Type
exercises, labs, and activities that either you yourself engage in
as you follow your guiding question OR design learning activities that
will guide other learners. You can also just cut and paste documents
into this box.
- The fourth section of the form is labeled "DISCUSS", which
is one of the five stages of the Inquiry cycle. Communication and community
are integral parts of the inquiry process. At any point you may find
opportunities (i.e.: listserves, in-class presentations, meetings with
coworkers/students/peers, webboards, etc.) that serve the "discuss"
aspect of your inquiry unit.
- Type
in the "DISCUSS" box those forms of discussion that apply
directly to your unit. Also type here any venues that are appropriate.
- The fifth section of the form is labeled "REFLECT", which
is one of the five stages of the Inquiry cycle. To "reflect"
means to assess where you are in terms of your guiding question. Reflect
on your research path, on certain activities you did, or even on the
guiding question itself:
- In the first box, step back and evaluate your inquiry. Type
answers to questions such as: Has a solution been found? Have new questions
come to light?
- In the second box, relate
the story of the unit. How did it go? If you have had responses from
other educators, share them here.
- At the end of the Inquiry Form it allows you to upload files from
your computer to the Inquiry Page server. These files can be images,
text, audio, or video.
- If you already know the file location and name(s), type
it in the fields provided.
- If you don't know the file name, click
on the "Browse…" button to the right of
each field.
- Locate the file you have chosen to upload and double
click on it. The file location and name will now appear
in the field.
NOTE:
The file name should be less than 80 characters, and the file name shouldn't
include any special characters except for the underscore character.
- To submit your unit, click
on the "Submit" button at the top or bottom of
the page. This posts your unit for others to see and search for on the
Inquiry Page website. A page will appear with your unit and a "Thank
you" at the bottom.
If you need additional support, see the How
to Add a Unit page.
| YOU
TRY IT! |
| Now
it's time for you to join the community of Inquiry creators! It
can be a general question to help you in lesson planning such
as: "How can I use eCUIP with my students?" or it can
be a subject-specific question based on an assignment such as:
"What was life like in the 1840s?" Create a unit lesson
plan based on resources available from the digital libraries listed
under "Resources" in this module, or others you know
about. Your Unit can be for yourself, other teachers, or for your
students. We will be beginning this in class, but we want you
to continue working on it as homework. Send your mentors the URL
of your Unit. Don't worry about it not being "done."
Units are always being worked on! |
|
|
Home
| What is the Inquiry page | Becoming
a Member | Searching Inquiry
Page | Creating Your Own Unit | Other
Ways of Creating a Unit | Editing
Your Unit | Resources
|